Writing a check in QuickBooks Online does more than prepare a piece of paper for your vendor. It also records the payment in your accounting records and reduces the balance of the bank account you select.
QuickBooks Online lets you create a check that you will print later or record the details of a check you have already written by hand. Intuit’s current U.S. instructions use the + Create menu to start the process.
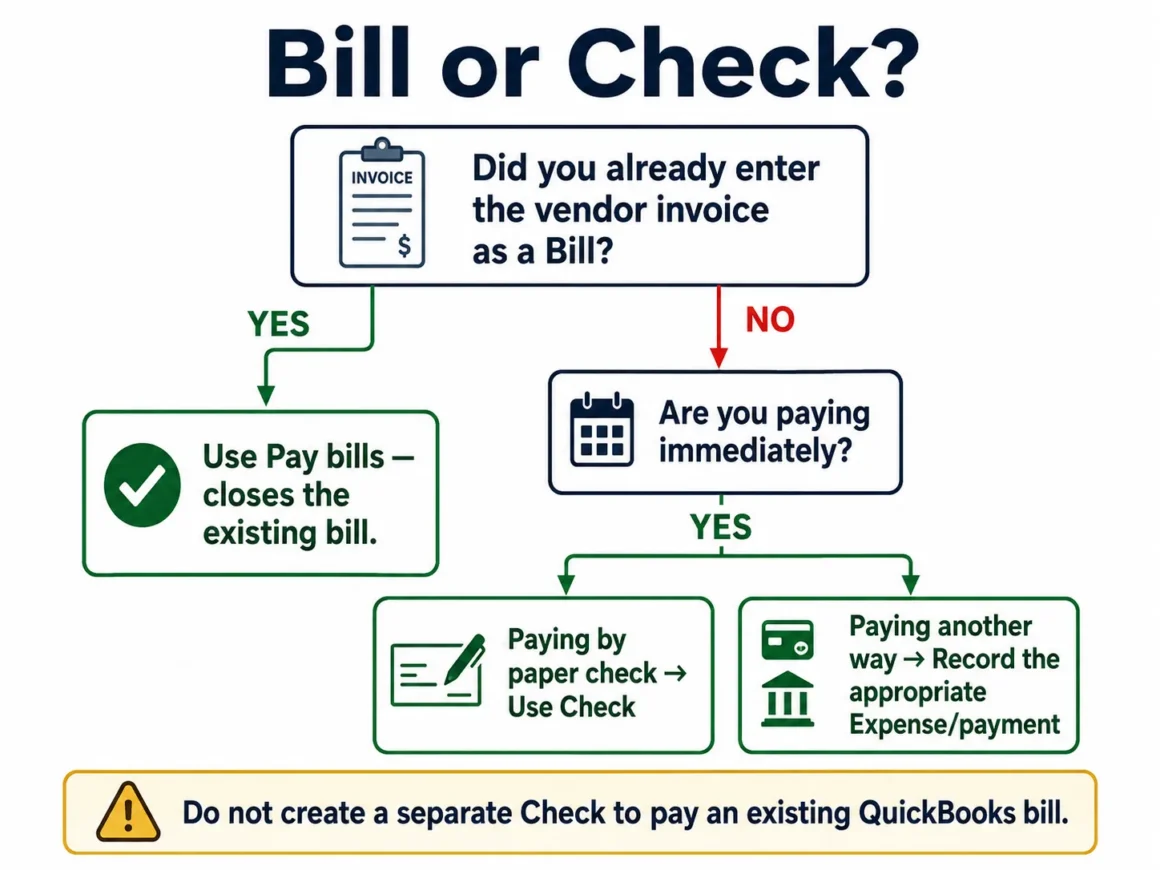
The most important thing to establish first is whether Check is actually the right transaction type. If you previously entered the vendor’s invoice as a bill, you normally should pay that existing bill instead of creating an unrelated check.
Quick Answer
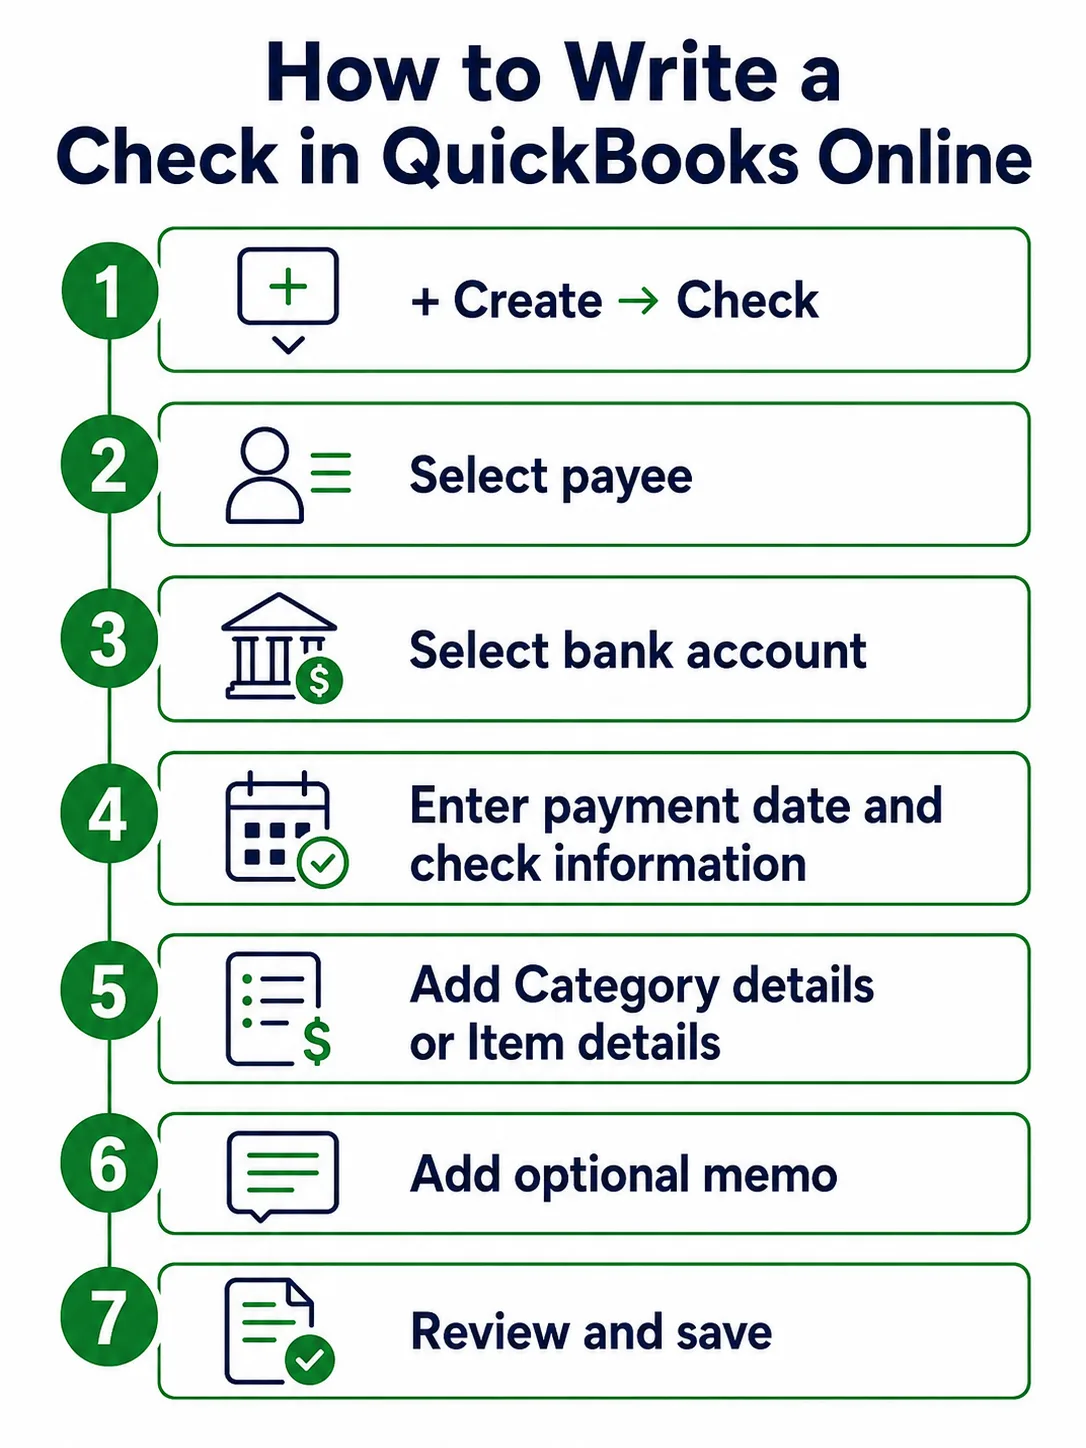
To write a check in QuickBooks Online:
- Select + Create, then Check.
- Choose the payee.
- Select the bank account the money will come from.
- Enter the payment date and check information.
- Enter the expense under Category details or the purchased products/services under Item details.
- Add a memo if useful.
- Select Save and close, or choose the appropriate printing option if you are ready to print.
If the payment relates to a bill that is already recorded in QuickBooks, use Pay bills instead.
Before You Start: Check vs. Pay Bills
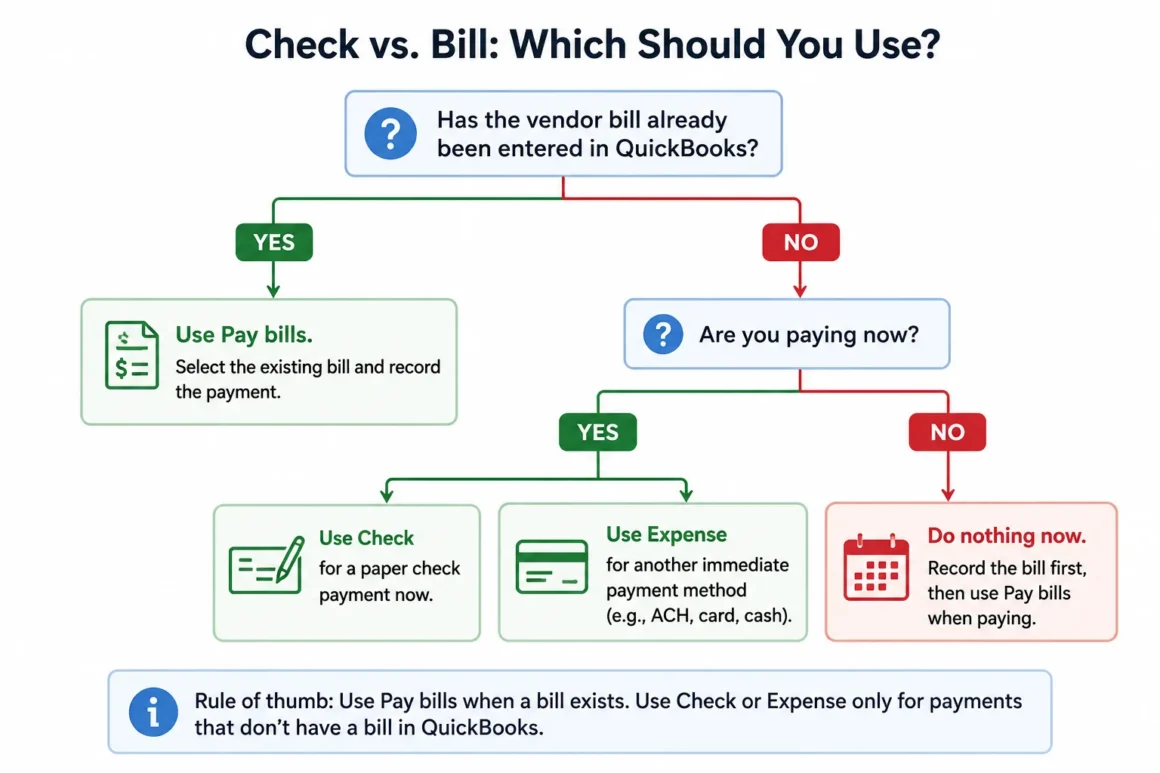
This is the bookkeeping distinction most likely to save you trouble later.
Use Check when you are paying immediately
A Check transaction is appropriate when money is coming directly from your bank account, and you are recording the purchase or payment at the same time.
Intuit describes checks as a way to pay expenses directly from a bank account when you do not want to use a credit card.
For example, suppose a repair company fixes your office door, and you immediately give the technician a $650 check. If you never entered an outstanding bill for that repair, recording the transaction as a Check can make sense.
Use Pay bills when a bill already exists
Suppose the same repair company instead sent you a $650 invoice last week and you entered it into QuickBooks as a Bill.
When you later pay that $650, do not simply enter a new Check transaction for the expense.
Intuit specifically instructs users to use Pay bills when a bill has already been recorded. Creating a separate Check or Expense can leave the original bill appearing unpaid and prevent the vendor balance from decreasing correctly.
A useful rule is:
| Situation | Transaction to use |
|---|---|
| Paying an expense immediately by check | Check |
| Recording a check you already wrote for an immediate expense | Check |
| Vendor invoice will be paid later | Bill |
| Paying a bill already entered in QuickBooks | Pay bills |
| Business cost already paid by another method | Usually Expense, depending on the payment method |
Intuit similarly explains that an Expense is generally used when the business cost has already been paid, while a Bill is used when payment will happen later.
How to Write a Check in QuickBooks Online
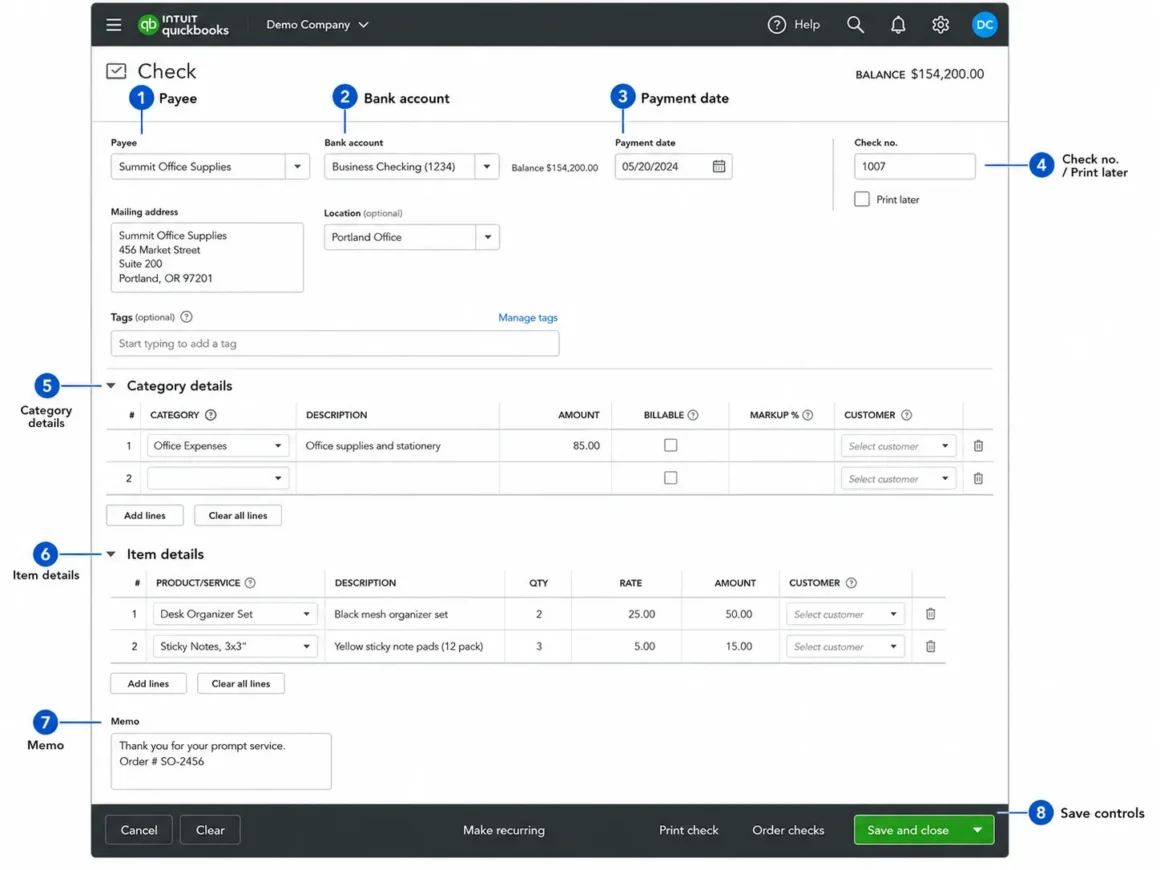
The following steps reflect Intuit’s current U.S. QuickBooks Online documentation as of August 2026.
1. Open the Check form
From QuickBooks Online, select:
+ Create → Check
Older tutorials may refer to + New. QuickBooks’ interface has evolved, so use the wording shown in your account if it differs slightly.
2. Choose the payee
Open the Payee dropdown and choose the person or vendor receiving the check.
Verify the recipient carefully. Using the correct vendor record helps keep vendor-level reporting and transaction history organized.
If you plan to mail the check, also review the Mailing address. Intuit notes that this address prints on the check.
3. Select the bank account
In Bank account, select the account from which the money will be paid.
This choice affects your books directly: after the check is saved, QuickBooks deducts the check total from the bank account selected in the transaction.
Do not choose an account merely because it is the default. Confirm that it matches the real checking account associated with the physical check.
4. Enter the date and check information
Review the following fields:
Payment date: Enter the date associated with the payment. QuickBooks allows you to change it from the default date.
Check no.: What you do here depends on whether you are printing the check or recording one already written.
For a handwritten check, clear Print later and enter the actual number from the physical check.
If you want the check included in a batch to print later, leave Print later selected.
5. Categorize what you are paying for
QuickBooks provides two main areas for the transaction details.
Category details
Use Category details for expenses that are not tied to a particular product or service item.
For example:
- Repairs and maintenance
- Office supplies
- Rent expense
- Professional fees
Enter the appropriate category, description, and amount.
Item details
Use Item details when the payment concerns specific products or services that you track in QuickBooks.
Intuit’s check instructions explicitly distinguish these uses: expenses not attached to specific products or services go under Category details, while products or services received can be recorded under Item details.
Choose the accounting category or item that reflects what actually occurred rather than selecting an arbitrary account simply to complete the form.
6. Add a memo if needed
The Memo field is optional.
A useful memo can make future research easier. For example:
Emergency repair – front office door
or:
Printer toner and shipping – Aug. 2026
Keep the memo informative rather than repeating information that is already obvious from the vendor and category fields.
7. Review and save the check
Before saving, verify:
- payee
- bank account
- payment date
- check number or Print later status
- category or item
- amount
- memo
Then select Save and close.
If you need to enter another check immediately, Intuit also provides Save and New.
Once saved, QuickBooks records the check as an expense and deducts its total from the selected bank account in the QuickBooks records.
Example: Recording a $650 Office Repair Check
Assume ABC Services paid a locksmith $650 immediately after an office repair.
A simplified Check transaction might look like this:
| Field | Example |
|---|---|
| Payee | City Locksmith LLC |
| Bank account | Business Checking |
| Payment date | August 12, 2026 |
| Check no. | 1842 |
| Category | Repairs and Maintenance |
| Description | Repair front office door |
| Amount | $650.00 |
| Memo | Emergency office door repair |
If check #1842 had already been handwritten, you would clear Print later and enter 1842 as the check number.
If the check still needed to be printed from QuickBooks, you could instead leave it queued for printing.
How to Record a Check You Already Wrote by Hand
You do not need to print every check from QuickBooks.
If you have already handwritten the physical check, Intuit’s workflow is essentially the same:
- Select + Create → Check.
- Choose the payee and bank account.
- Enter the payment details.
- Clear Print later.
- Enter the number shown on the handwritten check.
- Complete Category details or Item details.
- Save the transaction.
This records the payment in QuickBooks without placing it in the printing workflow.
How to Print a Check in QuickBooks Online
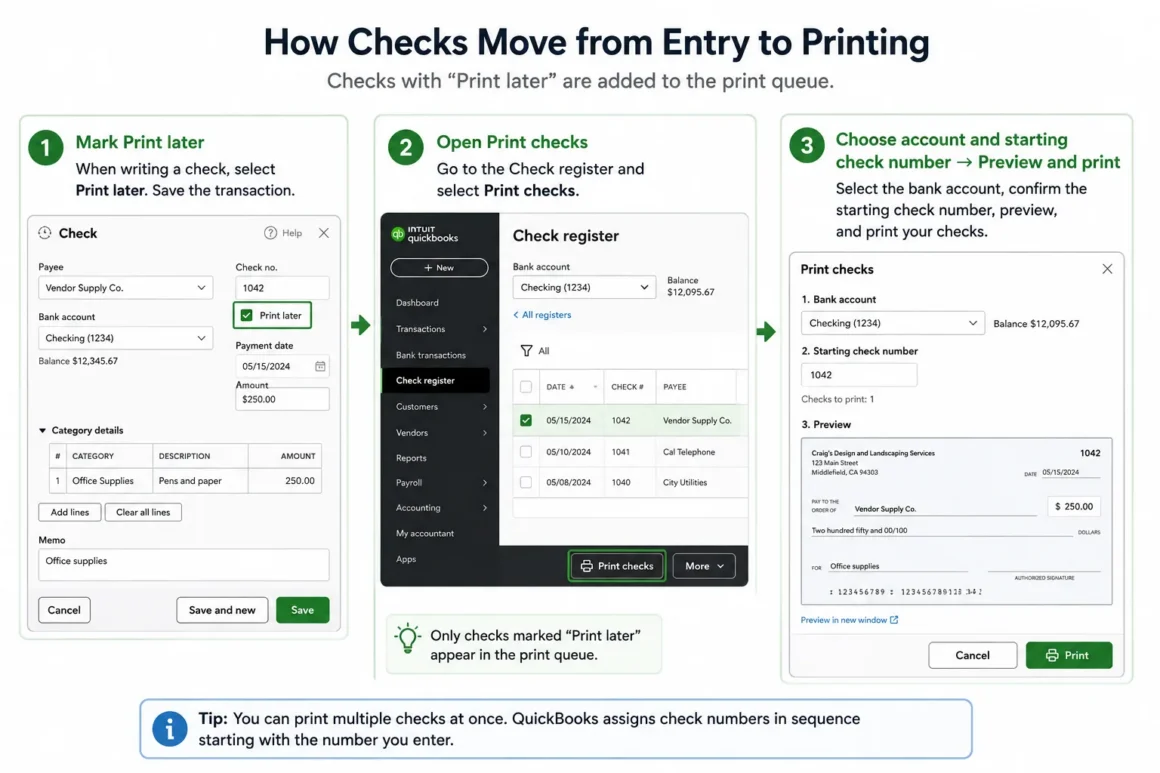
A check must first be recorded and added to the print queue before it can be batch-printed through QuickBooks Online.
QuickBooks navigation can vary somewhat by interface. Current Intuit support materials document routes involving All apps → Expenses & Bills → Expense transactions → Print checks, while another current support page directs users through + Create → Print Checks.
Use the available Print checks option in your account rather than assuming an older tutorial’s menu location must still match.
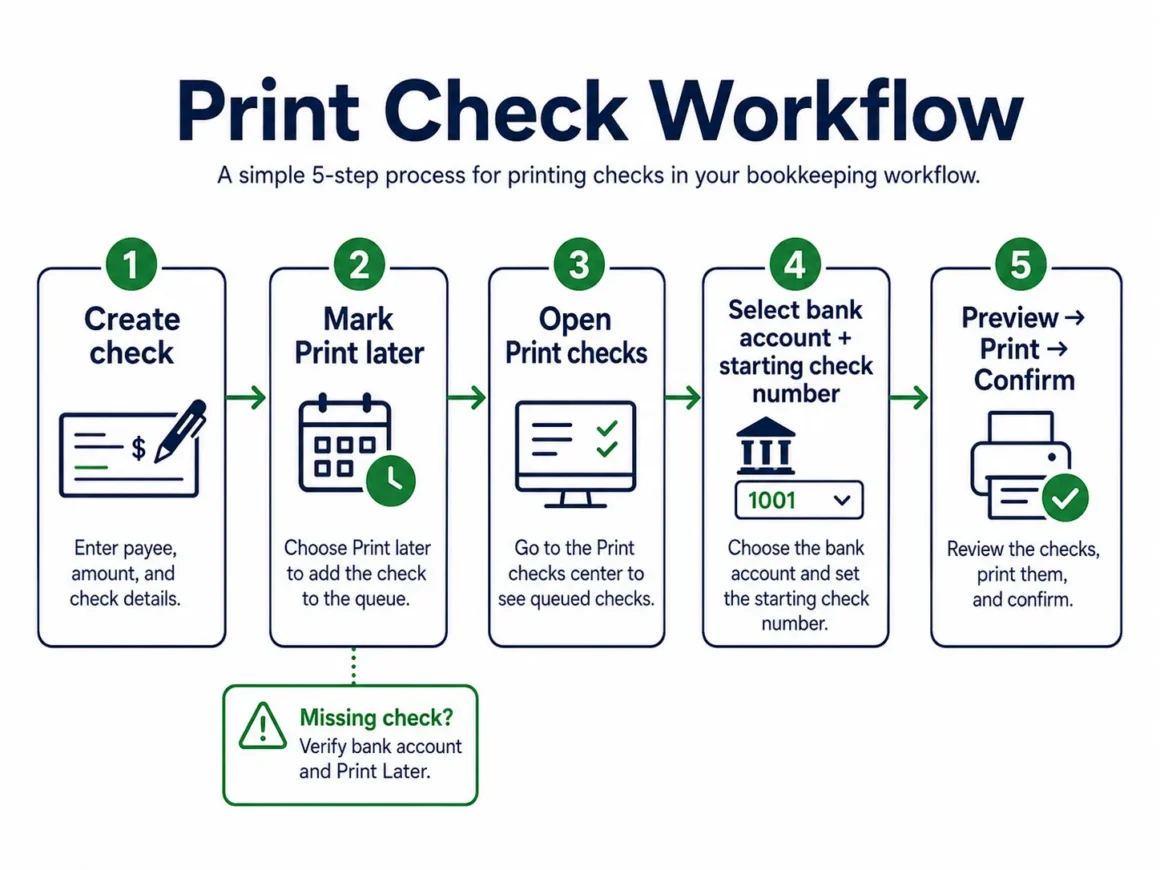
Printing from the queue
Intuit’s current workflow includes:
- Open the printing workflow.
- Select the correct bank account.
- Enter the starting check number, matching the first physical check loaded in your printer.
- Select the check or checks to print.
- Choose Preview and print.
- Review the preview.
- Print the checks.
- Tell QuickBooks whether all checks printed correctly.
That final confirmation matters because QuickBooks provides a reprinting option when only some checks printed incorrectly.
Standard vs. voucher checks
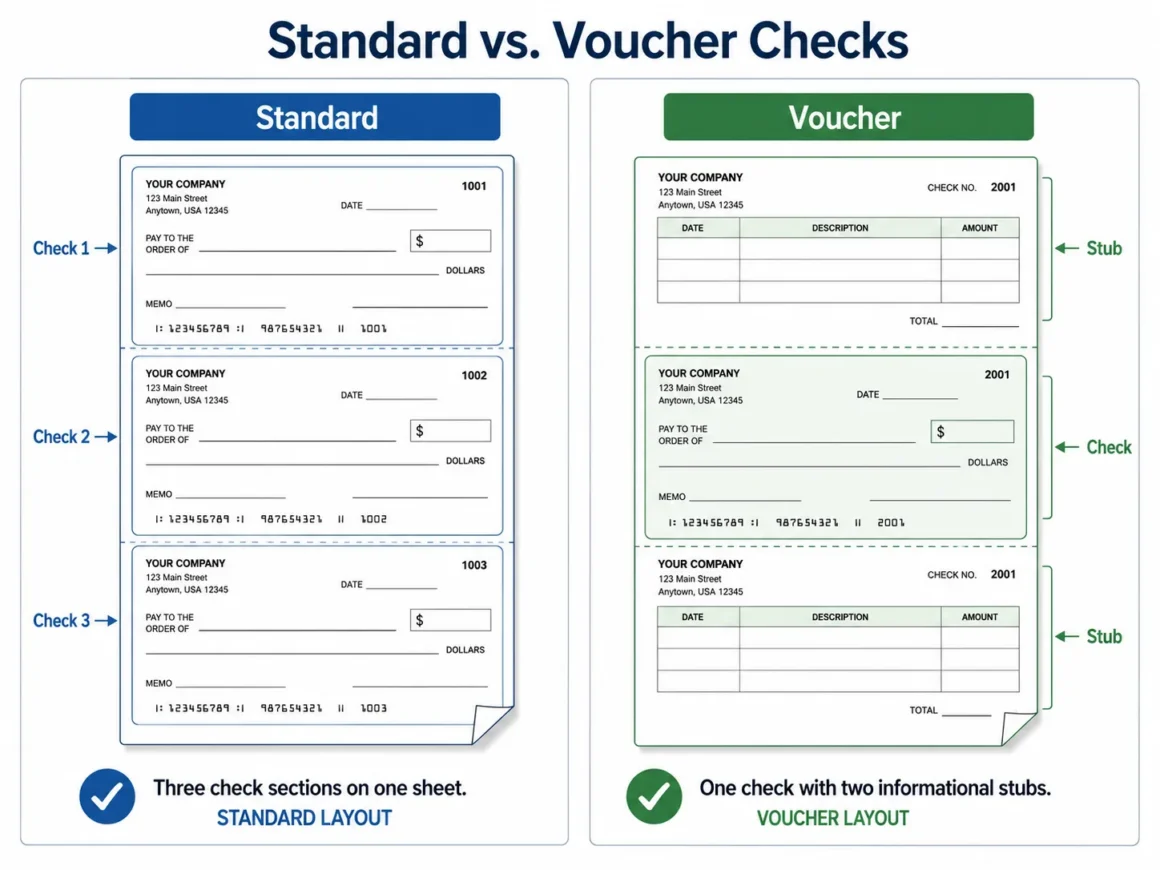
QuickBooks currently supports two check layouts in its setup instructions:
| Check type | Layout |
|---|---|
| Standard | Three checks per page |
| Voucher | One check plus check stubs |
Align the printer before using real check stock
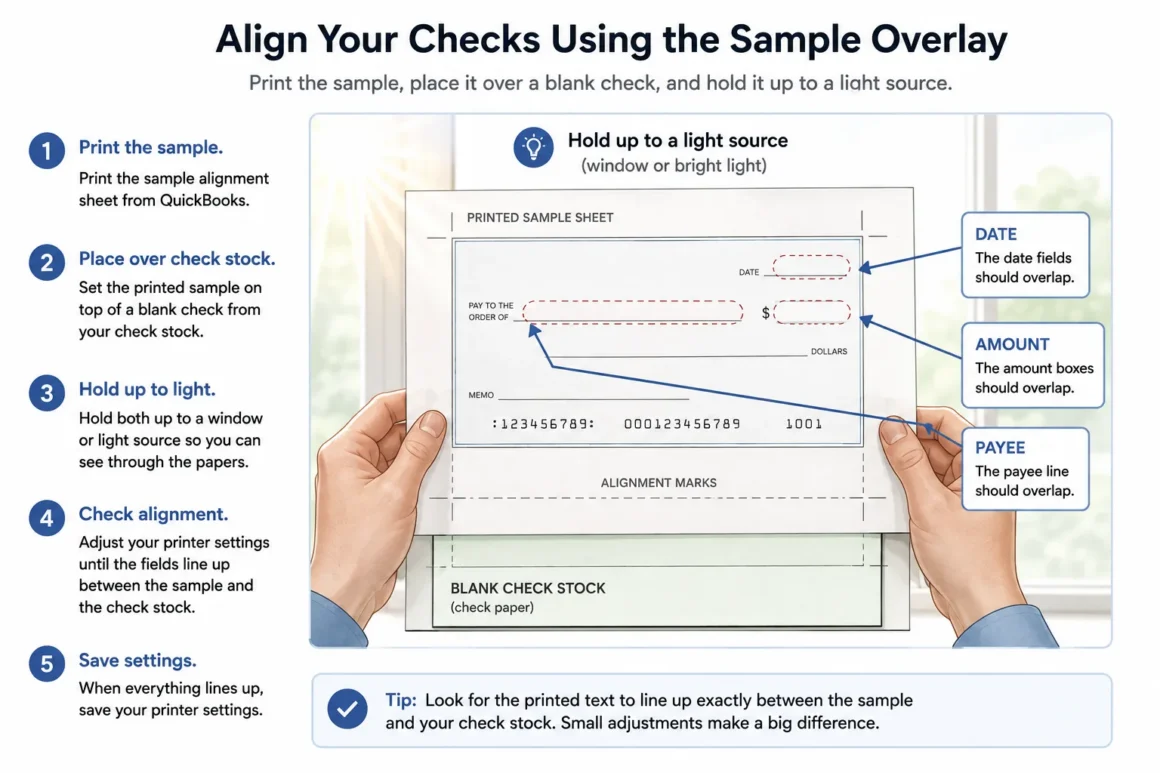
Before printing production checks, run a sample alignment test.
Intuit recommends printing a sample, placing it over a blank check, holding the two up to the light, and adjusting the print grid until the fields align properly.
That test is considerably safer than discovering an alignment problem after printing a batch of actual checks.
Why a Check May Be Missing From the Print Queue
If a check you just entered does not appear, check two things first.
1. Verify the bank account
The Print Checks window must be displaying the same bank account associated with the check you entered.
Intuit identifies an incorrect account selection as one reason a check or bill-payment check may be missing from the queue.
2. Verify Print later
Open the transaction and make sure Print Later is selected.
If it is not marked for later printing, QuickBooks may not include it in the print queue.
These checks are more useful than repeatedly recreating the transaction, which could introduce duplicates.
What Happens After You Save the Check?
Saving a regular Check transaction does two important bookkeeping things:
It records an expense.
It reduces the selected bank-account balance in QuickBooks by the total amount of the check.
That is why the bank account and accounting category deserve careful review before you save.
Remember that the QuickBooks balance is an accounting record. You should still reconcile your books to the actual bank activity as part of your normal bookkeeping process.
Common Mistakes to Avoid
1. Using a Check to pay a bill already entered
This is the most consequential mistake covered in Intuit’s documentation.
When the vendor’s invoice already exists as a Bill, use Pay bills. A separate Check can leave the bill appearing unpaid.
2. Selecting the wrong bank account
The selected bank account is the account QuickBooks reduces when the check is recorded.
3. Forgetting to enter the physical check number
When recording an already-handwritten check, clear Print later and enter the number shown on the actual check.
4. Putting everything into an arbitrary expense category
Use the category or item that reflects the underlying business transaction. Accurate categorization is more important than simply getting the transaction saved.
5. Printing before checking alignment
Run the sample-print process first, particularly after changing printers, browser settings, or check stock. Intuit provides a dedicated alignment workflow for this purpose.
6. Re-entering a check because it is missing from the print queue
First confirm the selected bank account and Print Later setting. Those are specific troubleshooting steps recommended by Intuit.
7. Does Creating a Check in QuickBooks Send It to the Vendor?
Not by itself.
The ordinary Check workflow records a check and lets you print it; you are responsible for what happens to the resulting physical check. Intuit describes the standard process as creating the check, printing it, and then sending it for payment.
QuickBooks Bill Pay is a separate service. Intuit says Bill Pay can let users choose an ACH transfer or have QuickBooks issue and mail a paper check to a vendor. Availability, subscriptions, eligibility and fees may apply to Bill Pay, so do not confuse that service with simply entering a Check transaction.
FAQ
Can I record a check that I already wrote by hand?
Yes. Create a Check transaction, clear Print later, enter the number from the handwritten check, complete the transaction details, and save it.
Can I print multiple checks at once?
Yes. QuickBooks Online’s print queue supports selecting multiple checks and printing them as a batch.
What is the difference between standard and voucher checks?
According to Intuit’s current printing documentation, standard checks contain three checks per page. Voucher checks have one check accompanied by check stubs.
Why isn’t my QuickBooks check showing up to print?
Check that the correct bank account is selected in the printing window and that the transaction is marked Print Later. Intuit lists both as causes of missing print-queue checks.
Should I use Check to pay a vendor bill?
Not if that bill was already entered into QuickBooks. Use Pay bills so the bill is properly closed and the vendor balance is updated.
What happens to my QuickBooks bank balance when I save a check?
QuickBooks records the check as an expense and deducts the check amount from the bank account selected on the transaction.
Does QuickBooks automatically mail a check that I create?
A standard Check transaction does not mean QuickBooks mails the payment for you. QuickBooks Bill Pay is a separate offering that can, where available, issue and mail paper checks to vendors.
Can I use QuickBooks for both handwritten and printed checks?
Yes. Intuit explicitly supports recording already-handwritten checks as well as creating checks to print from QuickBooks Online.
REFERENCES & SOURCES
The evidence base is intentionally dominated by first-party Intuit documentation rather than third-party SEO tutorials.
- Create and record checks — Intuit QuickBooks
- Type: Official documentation
- Updated: August 5, 2026
- Supports: creating checks, handwritten checks, payee, bank account, Print later, Category details, Item details, memo, saving, accounting result.
- Print a check in QuickBooks Online — Intuit QuickBooks
- Type: Official documentation
- Updated: August 5, 2026
- Supports: print queue, batch printing, starting check number, previewing, reprinting, standard vs. voucher checks.
- Configure print settings for checks in QuickBooks Online — Intuit QuickBooks
- Type: Official documentation
- Supports: sample printing and printer/check alignment procedure.
- Differences between bills, checks, and expenses — Intuit QuickBooks
- Type: Official documentation
- Current as researched August 2026
- Supports: using Pay bills for a previously entered bill and warning against paying it with an unrelated Check or Expense.
- Bill payments or checks are missing from the print queue — Intuit QuickBooks
- Type: Official documentation
- Updated: August 5, 2026
- Supports: checking the bank account and Print Later setting when transactions are absent from the queue.
- Enter and manage expenses in QuickBooks Online — Intuit QuickBooks
- Type: Official documentation
- Updated: August 5, 2026
- Supports: general distinction between an already-paid Expense and a Bill to be paid later.
- Learn about QuickBooks Bill Pay — Intuit QuickBooks
- Type: Official documentation
- Current as researched August 2026
- Supports: QuickBooks Bill Pay can use ACH or have QuickBooks issue and mail paper checks; separate service from ordinary check entry.
- Print Checks Online From Home — Intuit QuickBooks
- Type: Official product information
- Supports: general create/print/send workflow and synchronization with accounting records.